修改Docker数据目录
默认docker的镜像和容器存储都在/var/lib/docker目录下,如果系统盘空间较小,建议将docker数据目录调整到其他可用空间更大的目,避免系统盘空间不足。创建你想要更改到的新数据存储目录,并确保其权限正确。
下面将Docker的数据目录从/var/lib/docker迁移到/data/docker为例,需要执行一系列步骤来确保迁移过程顺利且不会丢失任何数据。
查看Docker是否安装,运行下面的命令来确认Docker已经正确安装并且可以正常工作。
Bash
sudo docker --versionsudo docker --version
确认 Docker 的镜像和容器默认存储位置,可以通过运行 docker info 命令来查看 Docker 根目录的位置。Docker 的根目录包含了所有 Docker 相关的数据,包括镜像、容器、卷等。
Bash
docker info
# 或者
docker info | grep "Docker Root Dir"
docker info
# 或者
docker info | grep "Docker Root Dir"这条命令会输出类似如下的信息,指示 Docker 数据的根目录,默认情况下是 /var/lib/docker:

这表明 Docker 正在使用 /var/lib/docker 作为其默认的数据存储目录。在这个目录下,你可以找到如下子目录:
- image:存储 Docker 镜像的相关数据。
- containers:存储每个容器的数据,每个容器都有一个对应的子目录,名称为容器的 ID。
- volumes:存储 Docker 卷的数据。
- 可能还有其他子目录如
builds,network等,具体取决于你的 Docker 版本和配置。
下面准备修改docker的数据目录
关闭docker服务。
bash
sudo systemctl stop docker
sudo systemctl stop docker.socket # 如果存在的话;也可不关闭(可选)
sudo systemctl stop docker
sudo systemctl stop docker.socket # 如果存在的话;也可不关闭(可选)备份现有数据(推荐)
尽管不是必须的,但强烈建议先备份现有的 Docker 数据:
txt
sudo cp -r /var/lib/docker /var/lib/docker.baksudo cp -r /var/lib/docker /var/lib/docker.bak迁移数据到新目录(使用rsync的好处是,可以断点续传并且保留文件的权限等相关属性)。
bash
sudo mkdir -p /data/docker
sudo rsync -aP /var/lib/docker/ /data/docker/
sudo mkdir -p /data/docker
sudo rsync -aP /var/lib/docker/ /data/docker/这里修改docker的数据目录有两种方式,任选其一:
- 方式一:修改数据文件
- Bash
# 在 /etc/docker/daemon.json 中增加如下属性。
"data-root": "/data/docker"

# 应用所做的更改并启动 Docker 服务。
sudo systemctl daemon-reload
# 在 /etc/docker/daemon.json 中增加如下属性。 "data-root": "/data/docker" # 应用所做的更改并启动 Docker 服务。 sudo systemctl daemon-reload
- 方式二:创建软链接
移动原有的 Docker 目录到 /data/docker后,创建指向新位置的软链接:
- Bash
sudo ln -s /data/docker /var/lib/docker # 创建sudo ln -s /data/docker /var/lib/docker # 创建
启动docker
json
sudo systemctl start dockersudo systemctl start docker查看配置是否生效。
bash
sudo systemctl status docker
docker info |grep "Docker Root Dir"
sudo systemctl status docker
docker info |grep "Docker Root Dir"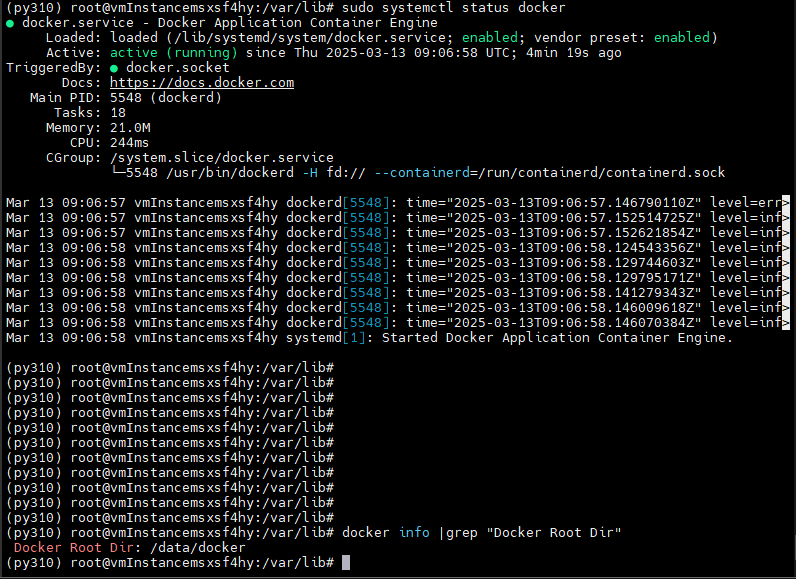
验证功能:
行如下命令验证docker是否正常。
bash
docker run hello-worlddocker run hello-world若正常返回如下信息:
sql
Unable to find image 'hello-world:latest' locally
latest: Pulling from library/hello-world
e6590344b1a5: Pull complete
Digest: sha256:e0b569a5163a5e6be84e210a2587e7d447e08f87a0e90798363fa44a0464a1e8
Status: Downloaded newer image for hello-world:latest

Hello from Docker!
This message shows that your installation appears to be working correctly.

To generate this message, Docker took the following steps:
 1. The Docker client contacted the Docker daemon.
 2. The Docker daemon pulled the "hello-world" image from the Docker Hub.
    (amd64)
 3. The Docker daemon created a new container from that image which runs the
    executable that produces the output you are currently reading.
 4. The Docker daemon streamed that output to the Docker client, which sent it
    to your terminal.

To try something more ambitious, you can run an Ubuntu container with:
 $ docker run -it ubuntu bash

Share images, automate workflows, and more with a free Docker ID:
 https://hub.docker.com/

For more examples and ideas, visit:
 https://docs.docker.com/get-started/
Unable to find image 'hello-world:latest' locally
latest: Pulling from library/hello-world
e6590344b1a5: Pull complete
Digest: sha256:e0b569a5163a5e6be84e210a2587e7d447e08f87a0e90798363fa44a0464a1e8
Status: Downloaded newer image for hello-world:latest
Hello from Docker!
This message shows that your installation appears to be working correctly.
To generate this message, Docker took the following steps:
1. The Docker client contacted the Docker daemon.
2. The Docker daemon pulled the "hello-world" image from the Docker Hub.
(amd64)
3. The Docker daemon created a new container from that image which runs the
executable that produces the output you are currently reading.
4. The Docker daemon streamed that output to the Docker client, which sent it
to your terminal.
To try something more ambitious, you can run an Ubuntu container with:
$ docker run -it ubuntu bash
Share images, automate workflows, and more with a free Docker ID:
https://hub.docker.com/
For more examples and ideas, visit:
https://docs.docker.com/get-started/(可选)原数据目录及备份目录可以留作备份或者删除。
bash
sudo rm -rf /var/lib/docker
sudo rm -rf /var/lib/docker.bak
sudo rm -rf /var/lib/docker
sudo rm -rf /var/lib/docker.bak(可选)修改镜像地址:
在/etc/docker/daemon.json中增加registry-mirrors属性,并重起docker服务。镜像地址源可能会失效,从网上(例:https://mirror.kentxxq.com/image)搜索可用地址自行增加。
json
  "registry-mirrors": [
        "https://docker.1panel.live",
        "https://docker.nju.edu.cn",
        "https://docker.m.daocloud.io",
        "https://dockerproxy.com",
        "http://hub-mirror.c.163.com",
        "https://docker.mirrors.ustc.edu.cn",
        "https://registry.docker-cn.com"
] "registry-mirrors": [
"https://docker.1panel.live",
"https://docker.nju.edu.cn",
"https://docker.m.daocloud.io",
"https://dockerproxy.com",
"http://hub-mirror.c.163.com",
"https://docker.mirrors.ustc.edu.cn",
"https://registry.docker-cn.com"
]为了使更改生效,你需要注销并重新登录。按照以上步骤操作后,你就成功地在Ubuntu 20.04上安装了Docker。现在你可以开始使用Docker来部署和管理容器化应用了。